Crafting a Backyard Fire Pit Sanctuary for Cozy Evenings

In this guide, you will learn how to design, locate, and construct a functional backyard fire pit sanctuary that balances safety, aesthetics, and ecological harmony. From selecting the right fuel source to choosing fire-safe landscaping, these steps provide a technical roadmap for creating a permanent outdoor gathering space.
Phase 1: Site Selection and Safety Fundamentals
The success of a fire pit depends entirely on its placement. A common mistake is prioritizing the view over safety regulations. Before you move a single stone, consult your local municipal fire codes and your Homeowners Association (HOA) guidelines. Many jurisdictions require a minimum clearance of 10 to 25 feet from any combustible structures, such as wooden fences, vinyl siding, or low-hanging tree limbs.
Look for a site that offers natural wind protection without creating a wind tunnel. A corner of the yard sheltered by a dense evergreen hedge, such as Thuja occidentalis (American Arborvitae), provides a natural windbreak that keeps smoke from blowing directly into your dining area. Avoid low-lying areas where smoke might settle, and stay away from large tree root systems; the heat from a sustained fire can desiccate the soil and damage the delicate feeder roots of nearby specimen trees.
The Ground Surface Rule: Never build a fire pit directly on top of a wooden deck or a lush lawn. Even with a heat shield, the radiant heat can scorch grass or warp wood. Instead, choose a site with well-draining soil or prepare a non-combustible base. Ideal surfaces include pea gravel, crushed basalt, or flagstone pavers. If you are building on a patio, ensure the pit is placed at least 12 inches away from the edge to prevent heat transfer to the sub-base.
Phase 2: Choosing Your Fire Pit Style and Fuel Source
Your choice of fire pit dictates both the maintenance level and the "vibe" of your sanctuary. There are three primary categories to consider: wood-burning, gas/propane, and smokeless fire pits.
Wood-Burning Pits: The Traditionalist’s Choice
Wood-burning pits provide the quintessential crackle and scent that many gardeners crave. However, they require more management. To minimize smoke, you must use seasoned hardwood like oak, hickory, or maple. Avoid softwoods like pine or cedar, as their high resin content produces excessive smoke and dangerous sparks. If you want a more controlled burn, look for a Solo Stove or a similar high-airflow design that utilizes secondary combustion to burn off smoke particles before they leave the pit.
Gas and Propane: The Low-Maintenance Option
If your goal is a "set it and forget it" experience, a propane or natural gas fire table is superior. These units are incredibly clean and offer instant control over flame height. They are perfect for small spaces or for those who want a flickering light without the mess of ash. However, keep in mind that gas pits lack the olfactory experience of wood and can be more expensive to install if you require a professional gas line run.
The DIY Stone Build: A Permanent Installation
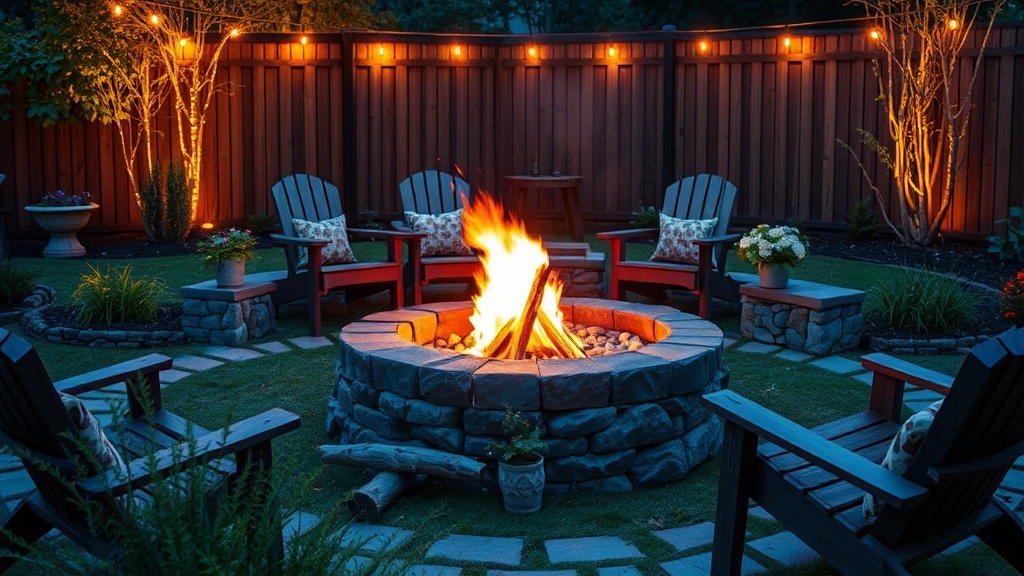
For a permanent, heavy-duty structure, a stone masonry pit is the most durable. You can use Belgard pavers or natural fieldstone to create a rustic look that blends into a wilder garden. When building with stone, always include a steel fire ring insert. This prevents the stones from cracking due to thermal expansion and provides a much-safer containment zone for your fuel.
Phase 3: Constructing the Foundation and Base
A stable foundation prevents the pit from tilting or sinking over time. Follow these technical steps for a professional-grade installation:
- Excavation: Dig out the area for your pit and the surrounding seating zone. If you want a 10-foot diameter seating area, dig a circle roughly 12 feet wide to allow for a buffer. Dig down approximately 4 to 6 inches.
- Sub-Base Layer: Fill the excavated area with 3 inches of crushed stone or "road base" (a mix of gravel and fines). This provides a stable, non-settling foundation.
- Compaction: This is the most critical step. Use a hand tamper or a rented power plate compactor to pack the crushed stone down until it is rock-hard. A poorly compacted base will lead to an uneven seating area and a lopsided fire pit.
- Surface Layer: Lay your decorative top layer. For a textured, organic look, use Pea Gravel or Decomposed Granite. If you prefer a more formal aesthetic, use large-format flagstones with wide gaps filled with creeping thyme or moss.
If you are creating a more curated environment, consider how your seating area interacts with your existing garden. For instance, if you have already developed a moon garden with night-blooming plants, ensure your fire pit lighting is soft and indirect so you don't wash out the subtle glow of your white flowers and silver foliage.
Phase 4: Landscaping for Atmosphere and Safety
A fire pit alone is just a hole in the ground; the landscaping turns it into a sanctuary. To create a sense of enclosure and intimacy, use a "layered" planting approach. Use tall, structural plants at the perimeter and shorter, more textural plants near the seating area.
The "Safe Zone" Plant Palette:
- Structure: Use non-combustible structural elements like large boulders or stone retaining walls to define the space.
- Texture: Plant ornamental grasses like Miscanthus sinensis (Maiden Grass) or Pennisetum (Fountain Grass) around the perimeter. These add movement and a soft "rustle" to the evening air, but keep them at least 5 feet away from the actual flame.
- Aroma: Incorporate aromatic herbs near the seating area. Planting Lavandula (Lavender) or Rosmarinus officinalis (Rosemary) provides a calming scent that complements the warmth of the fire.
If your backyard is compact, you can use vertical elements to create height and privacy without taking up much ground space. Integrating vertical gardening techniques, such as a trellis with climbing jasmine, can create a fragrant, green wall that makes your fire pit feel like a secluded room.
Phase 5: The Finishing Touches: Seating and Lighting
The furniture you choose should be as durable as the fire pit itself. Avoid lightweight plastic chairs that can tip easily or melt near high heat. Instead, opt for heavy teak Adirondack chairs, wrought iron benches, or stone seating walls. Teak is an excellent choice for outdoor spaces as it weathers to a beautiful silver-gray, blending seamlessly with a naturalistic garden.
Lighting should be subtle. You want to see your companions and your feet, not a blinding glare. Avoid bright floodlights. Instead, use:
- Low-Voltage Path Lights: To mark the way from the house to the pit.
- Solar Lanterns: Scattered among the plants to provide a soft, ambient glow.
- String Lights: If you hang Edison-style bulbs, ensure they are high enough to be well above the heat zone and use heavy-duty, weather-rated wiring.
Finally, consider the "ritual" of the evening. A well-designed sanctuary includes a nearby station for refreshments. If you enjoy hosting, a small stone table for drinks and a tray of seasonal treats will elevate the experience from a simple fire to a true outdoor event. For inspiration on garden-to-table entertaining, you might enjoy exploring ideas for designing a backyard cocktail garden to complement your new space.
"A garden is not just a collection of plants; it is a collection of moments. A fire pit is the anchor that holds those moments in place."
By following these technical specifications—prioritizing a compacted base, selecting the correct fuel, and maintaining a safe distance from combustibles—you will create a backyard feature that is not only beautiful but also a safe, enduring part of your home's ecosystem.
Steps
- 1
Choose Your Location and Type
- 2
Prepare the Ground and Foundation
- 3
Assemble Your Fire Pit Structure
- 4
Design the Surrounding Seating Area
- 5
Add Ambience with Lighting and Decor