5 Smart Ways to Use Outdoor Lighting for Mood and Safety

Warm String Lights for a Relaxed Vibe
Pathway Lanterns for Safety and Direction
Up-lighting to Highlight Architectural Features
Task Lighting for Outdoor Dining and Cooking
Solar-Powered Accents for Low Maintenance Glow
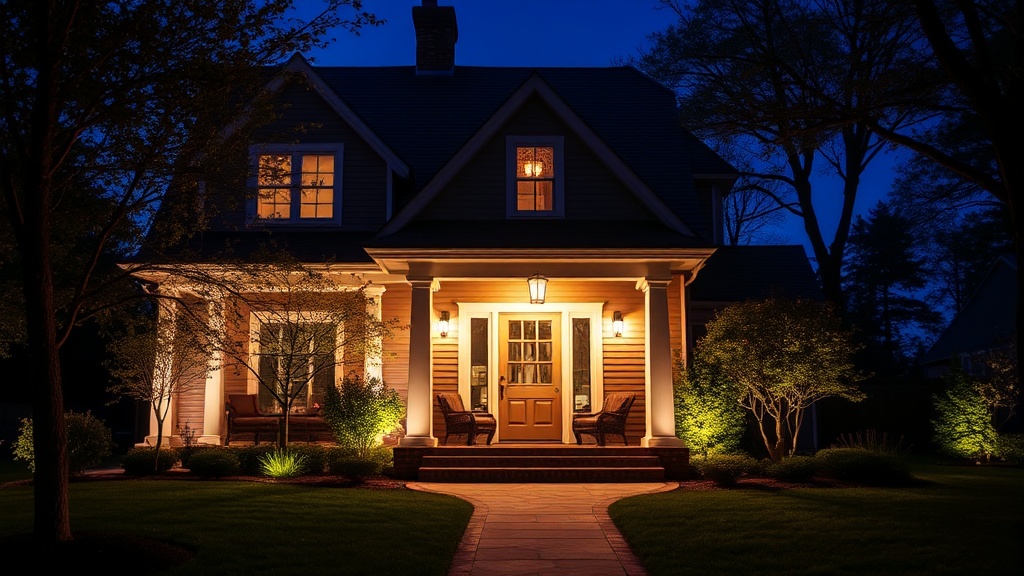
Most people think outdoor lighting is about visibility—blasting a bright, white light over a patio so they can see where they are stepping. They buy high-wattage floodlights and mount them on the eaves of the house, creating a harsh glare that flattens the textures of your plants and drives the local wildlife away. This approach is a mistake. Effective outdoor lighting should serve two masters: it must provide enough light to navigate safely without creating "light pollution," and it must use shadows to create depth and atmosphere. This guide covers five practical strategies to use light to enhance your garden's mood while ensuring your pathways and entryways remain secure.
1. Layer Your Light Sources
A common error in backyard design is relying on a single, powerful light source. This creates high-contrast glare that makes the edges of your garden look like a black void. Instead, think in layers. You need three distinct levels of light: task lighting, ambient lighting, and accent lighting.
Task lighting is purely functional. This is the light you need when you are actually doing something, such as grilling on a Weber kettle or walking a dog through a narrow side passage. For these areas, use directional lights that point exactly where the work is happening. A heavy-duty LED lantern on a patio table or a recessed light under a kitchen overhang works well here.
Ambient lighting provides the general glow that allows you to relax. Rather than using a bright overhead porch light, consider stringing Edison-style bistro lights across a pergola or a seating area. These provide a soft, diffused light that mimics the warmth of a sunset. If you have a large vegetable patch or a raised bed garden, ambient light can help define the boundaries of your garden without making it look like a stadium.
Accent lighting is where you add the "mood." This is the light used to highlight a specific feature, like the trunk of an old Japanese Maple or the texture of a stone retaining wall. Use small, low-voltage spotlights tucked into the foliage to create a sense of depth. By layering these three, you avoid the "interrogation room" effect and create a space that feels lived-in and intentional.
2. Prioritize Warm Color Temperatures
The color temperature of your bulbs is measured in Kelvin (K). Many cheap outdoor LED floodlights come in the 5000K to 6500K range, which is a "cool blue" light. While this is great for a warehouse or a parking lot, it is terrible for a home garden. Cool light feels clinical, harsh, and can actually disrupt your circadian rhythm if you are sitting outside in the evening.
For a garden that feels welcoming and cozy, aim for bulbs in the 2200K to 3000K range. This is "warm white" light, which has a golden, amber hue. This spectrum of light complements the natural greens and browns of your garden beds. It also has a psychological effect; warm light signals to the brain that it is time to wind down, making your outdoor seating area a true extension of your living room.
When shopping, look specifically for the Kelvin rating on the packaging. If you are using solar-powered path lights, be wary of the ultra-cheap models; many of them default to a bright, blue-white light that can look tacky. Investing in a few high-quality, warm-toned LED units will make a massive difference in how your garden looks at dusk.
3. Use Up-Lighting to Create Depth
One of the most effective ways to make a small backyard feel much larger is through the use of up-lighting. Most people naturally point lights down from their houses, which makes the ground look bright and the trees look like dark silhouettes. Up-lighting reverses this, drawing the eye upward and highlighting the architecture of your plants.
Place a small, shielded spotlight at the base of a specimen plant. For example, if you have a large ornamental grass or a structural shrub, point the light upward through the leaves. This creates a beautiful play of light and shadow on the underside of the branches. This technique is particularly effective for:
- Tree Trunks: Highlighting the texture of bark on an Oak or Birch tree.
- Vertical Structures: Shining light up a trellis or a wooden fence to create texture.
- Architectural Features: Illuminating a stone water feature or a garden statue.
A key rule of thumb for up-lighting is to hide the light source. You want to see the effect of the light, not the bulb itself. If a guest can see the actual light fixture, it breaks the illusion and looks cluttered. Use "well lights" that sit flush with the ground or "spike lights" that can be tucked deep into the mulch or under heavy foliage.
4. Focus on Path Safety with Low-Profile Lighting
Safety is the most practical reason to install outdoor lighting, but you don't need a bright runway to achieve it. The goal is to illuminate the path, not the air. High-intensity lights that shine directly into your eyes as you walk can be disorienting and create "blind spots" where your eyes haven't yet adjusted to the light.
Instead of placing lights directly in the middle of a walkway, place them to the side. Use low-profile path lights that cast a downward glow onto the ground. This illuminates the edges of the path and any potential trip hazards—like tree roots or uneven stones—without creating glare.
If you have a long walkway leading to a garden gate, consider using "bollard" style lights. These are slightly taller than standard path lights and provide a more substantial, architectural look. They are excellent for defining a clear route through a dense garden. To ensure safety, make sure the light covers the transition points, such as where a patio meets a grass area or where a step occurs. If you have a garden that includes low maintenance perennials, these lights can help define the edges of your beds so you don't accidentally step into a flower bed while walking at night.
5. Minimize Light Pollution and Protect Wildlife
As a gardener, I am acutely aware of how much light we cast into the environment. Excessive, unshielded lighting doesn't just bother your neighbors; it disrupts the natural cycles of insects, birds, and nocturnal animals. If you use bright, upward-facing lights, you are essentially creating a beacon that attracts moths and other insects, which can lead to an imbalance in your garden's ecosystem.
To be a responsible gardener, follow these three rules for light management:
- Use Shielded Fixtures: Choose lights that have a "cap" or a shroud. This ensures the light is directed downward toward your target (like a path or a plant) rather than scattering into the sky.
- Use Motion Sensors for Security: Instead of leaving a bright floodlight on all night near your shed or back door, install a motion-activated light. This provides security when you actually need it but stays dark when you don't, reducing the impact on local wildlife.
- Set Timers: Don't let your decorative lights run until dawn. Use a smart plug or a simple mechanical timer to ensure your accent lights turn off after a certain hour. This allows your garden to return to its natural, dark state once your evening activities are finished.
By focusing on direction, color, and timing, you can transform your outdoor space from a dark, uninviting patch of land into a sophisticated, safe, and atmospheric sanctuary. Good lighting is about what you choose to reveal, not just what you choose to brighten.