The Complete Guide to Starting a Raised Bed Vegetable Garden

This guide walks through every step of building and planting a raised bed vegetable garden—from choosing materials and filling beds to selecting crops and maintaining soil health. Raised beds warm up faster in spring, drain better during heavy rains, and let you control soil quality without fighting existing clay or compacted ground. Whether you're working with a small backyard in Portland or a sunny strip along a garage in Phoenix, you'll find practical instructions to get growing this season.
What Are the Real Benefits of Raised Bed Gardening?
Raised beds offer clear, practical advantages over traditional in-ground planting. Soil in a raised bed drains faster, which means fewer rotted roots after a week of spring rain. The soil also warms up earlier, so you can plant tomatoes and peppers a week or two sooner. You'll bend less (your back will thank you), and you'll deal with fewer weeds—especially if you lay cardboard at the base before filling.
Here's the thing: raised beds aren't just about convenience. They create defined growing spaces that keep foot traffic off the soil, which preserves the loose, aerated structure plants need. You can customize soil blends for specific crops—acidic mixes for blueberries, sandy loam for carrots, rich compost for squash. That kind of control is hard to achieve when you're planting straight into native dirt.
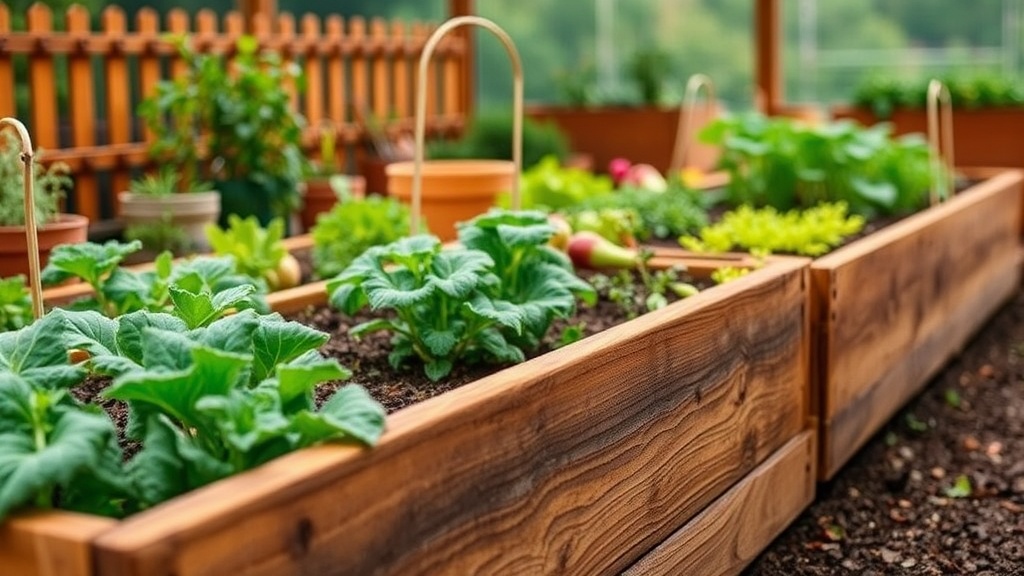
Spacing matters, too. Most raised beds are built in 4-foot widths so you can reach the center from either side without stepping in. Length is flexible—8 feet is common because lumber comes in standard sizes, but 6 or 10 feet works fine if the space demands it. Depth should be at least 6 inches for lettuces and herbs, though 10 to 12 inches is better for tomatoes, carrots, and root crops that need room to stretch.
What Materials Work Best for Building Raised Beds?
The best material depends on budget, aesthetics, and how long you want the bed to last. Cedar and redwood are the gold standard for wood beds—they resist rot naturally and hold up for 10 to 15 years. Pressure-treated lumber is cheaper and widely available, though some gardeners prefer to line the interior with space fabric as a barrier. Metal beds (like those from Vegega) heat up quickly and last decades, while composite boards from brands like Trex offer a clean, modern look with minimal maintenance.
Avoid railroad ties and old pressure-treated wood from unknown sources. Creosote and older chemical treatments can leach into soil. Concrete blocks work in a pinch, though they raise soil pH over time and can harbor snails in their hollow cores. Galvanized steel is food-safe and increasingly popular—just don't skimp on gauge; thinner metals dent and bow when soil expands.
| Material | Lifespan | Cost (per 4×8 bed) | Best For |
|---|---|---|---|
| Cedar | 10–15 years | $80–$150 | Natural look, DIY builders |
| Pressure-treated pine | 5–8 years | $40–$70 | Budget projects |
| Galvanized steel | 20+ years | $100–$200 | Modern aesthetics, durability |
| Composite (Trex) | 25+ years | $150–$250 | Low maintenance, clean lines |
Worth noting: you don't need to be a carpenter. Pre-fabricated raised bed kits from Greenes Fence snap together in minutes with no tools. That said, building from lumber gives you custom dimensions and costs less if you've already got a drill and a miter saw.
How Should You Fill a New Raised Bed?
The most cost-effective approach is layering. Start with cardboard or several layers of newspaper spread directly on grass or weeds—this smothers existing vegetation and attracts worms. On top of that, add sticks, leaves, grass clippings, and other compostable yard debris. This bottom layer (often called hugelkultur) breaks down over time, improving drainage and feeding soil biology.
Next comes the soil. A proven blend for vegetable beds is roughly 60% topsoil, 30% compost, and 10% aeration material like perlite or coarse sand. If you're filling multiple beds, ordering in bulk from a local space supplier saves money over bagged soil from big-box stores. Ask for a "garden mix" or "raised bed blend," but verify what's in it—some suppliers cut corners with too much sand or unfinished wood chips.
The catch? Cheap fill dirt isn't the same as garden soil. It'll compact, drain poorly, and leave you with stunted plants by July. Invest in quality compost—Mushroom compost, Coast of Maine Lobster Compost, or locally sourced leaf mold all work well. A 4×8 foot bed that's 10 inches deep needs about 27 cubic feet of material. Buy a little extra; soil settles.
Don't worry about perfection on day one. Soil is a living thing that improves with seasons. Top-dress with an inch or two of compost each spring, and within three years you'll have black, crumbly earth that smells sweet and holds moisture like a sponge.
Which Vegetables Should You Plant First?
Start with crops that deliver quick wins and tolerate beginner mistakes. Leafy greens—lettuce, spinach, kale—germinate fast and produce harvestable leaves within 4 to 6 weeks. Radishes are even quicker; some varieties (like 'Cherry Belle') go from seed to salad bowl in 22 days. Bush beans, zucchini, and cherry tomatoes offer reliable summer harvests with straightforward care.
Here's the thing: not every vegetable belongs in a raised bed. Sweet corn needs too much space and too many plants for proper pollination. Pumpkins and winter squash sprawl aggressively and can overrun a small bed. Asparagus takes three years to establish and occupies the same real estate for decades—better suited to a dedicated perennial patch.
For a balanced 4×8 bed, try this layout:
- North end (tallest plants): Determinate tomatoes like 'Roma VF' or 'Celebrity' staked with Gardener's Supply tomato cages
- Center rows: Pepper plants ('California Wonder' or 'Jalapeño M'), bush beans ('Contender' or 'Provider')
- South end (shortest plants): Lettuce mixes, radishes, and dwarf basil ('Spicy Globe')
That arrangement keeps tall crops from shading shorter ones. Succession planting—dropping new lettuce seeds every two weeks—extends harvests and keeps the bed productive from April through October.
How Do You Maintain Soil Fertility Season After Season?
Raised bed soil doesn't recharge itself the way in-ground garden plots do. You have to feed it. The simplest system is compost, cover crops, and mulch—used in rotation. Each spring, spread a 2-inch layer of finished compost over the surface. Don't dig it in; let worms and rainfall carry nutrients downward. In fall, plant cover crops like crimson clover or winter rye, then cut them down and let the roots decompose before spring planting.
Mulch is your water-saving ally. Straw (not hay—hay contains weed seeds), shredded leaves, or grass clippings keep soil cool and moist during July heat waves. A 3-inch layer suppresses weeds, too. Just keep mulch a few inches away from plant stems to discourage slugs and rot.
Test soil every two or three years with a kit from Ryan Soil Test or your local cooperative extension office. Raised beds can become acidic over time from compost and rainfall. If pH drops below 6.0, add garden lime in fall so it has time to work before spring planting. Most vegetables prefer a pH between 6.2 and 6.8.
"The best fertilizer is the gardener's shadow." — Old gardening proverb
That said, walking the beds daily does more than spot pests early. It builds observational skills. You'll notice when soil looks dry, when leaves turn yellow (often a nitrogen signal), and when a volunteer tomato pops up from last year's dropped fruit. Those small observations prevent big problems.
What Mistakes Do Beginners Make—and How Can You Avoid Them?
The most common mistake is building beds too wide. Four feet is the maximum comfortable reach for most adults; go wider, and you'll end up kneeling on the soil to weed the center—which defeats the purpose. Another frequent error is overplanting. Twenty tomato plants in a 4×8 bed crowd each other, reduce airflow, and invite blight. Follow spacing guidelines on seed packets. Thin seedlings ruthlessly; one strong plant always outproduces three straggly ones.
Watering habits trip people up, too. Light daily sprinkles encourage shallow roots. Deep, infrequent soaking—roughly one inch of water per week—forces roots to dig deep and makes plants more drought-tolerant. Drip irrigation (like a Rain Bird drip kit) saves time and keeps foliage dry, which reduces fungal issues.
Finally, don't plant the same crop in the same spot year after year. Rotate plant families—tomatoes one year, beans the next, squash the third—to break disease and pest cycles. Even in a single raised bed, moving things around matters. Keep a simple garden journal (a notebook works fine) to track what grew where. Future seasons will thank you.
Raised bed gardening rewards patience and observation. Start with one bed, fill it well, plant what you love to eat, and build from there. Before long, you'll be harvesting dinner from the backyard—and wondering why you ever bothered with a lawn.