Building a Thriving Backyard Compost System from Scratch

The Hidden Power of Decomposition
Did you know that nearly 30% of what we throw into the trash could actually be turned into "black gold" for our gardens? Most people see a pile of kitchen scraps and dead leaves as waste—something to be hauled away in a plastic bin—but that pile is actually a biological powerhouse. This post covers how to build, maintain, and use a composting system that turns your organic leftovers into nutrient-dense soil amendments. Instead of buying expensive, synthetic fertilizers, you'll learn to build a self-sustaining cycle right in your backyard.
Composting isn't just about recycling; it's about creating a living ecosystem. When we throw food scraps into a landfill, they rot without oxygen and produce methane. But when we manage a compost pile with intent, we're inviting microbes, fungi, and worms to do the heavy lifting for us. It's a way to close the loop in your own backyard, turning yesterday's coffee grounds into tomorrow's prize-winning tomatoes.
What are the best materials for a backyard compost pile?
To get a compost pile moving, you need a specific balance of materials. I like to think of it as a recipe. If you have too much of one thing, the pile gets soggy or smelly; if you have too little, it just sits there doing nothing. You need a mix of "Greens" and "Browns."
- The Greens (Nitrogen): These are your wet, nitrogen-rich materials. Think kitchen scraps (fruit peels, veggie ends), coffee grounds, and fresh grass clippings. These provide the fuel for the microbes.
- The Browns (Carbon): These are your dry, carbon-rich materials. This includes dried leaves, straw, shredded cardboard, and even sawdust. These provide the energy and structure.
A good rule of thumb is to aim for a ratio of roughly three parts "Browns" to one part "Gre"'s by volume. If your pile smells like rotten eggs, you've got too much nitrogen (too many greens) and not enough air. If nothing is happening at all, you might need more nitrogen or a bit more water. It's a delicate dance, but once you find the rhythm, it's incredibly rewarding.
How do I start a compost pile without it smelling bad?
The biggest fear I hear from folks is that a compost pile will make the backyard smell like a landfill. A well-managed pile shouldn't smell like much more than damp earth. The odor usually comes from two things: too much moisture or a lack of oxygen. If you aren't turning your pile, the material at the bottom becomes anaerobic (lacking oxygen), which is when the stink starts.
To prevent this, use a pitchfork to turn your pile every week or two. This introduces fresh air into the center. Also, always make sure your pile is covered by a layer of "Browns." If you add a bowl of kitchen scraps, toss a handful of dried leaves or shredded newspaper over them immediately. This acts as a natural filter. For more detailed information on the chemistry of decomposition, you can check out the resources at the EPA website, which offers great technical-level breakdowns of the process.
Another way to keep things clean is to avoid adding certain things. Never put meat, dairy, or oils in your pile. These attract pests and cause much more significant odor issues than vegetable scraps ever will. Stick to the basics: plant matter and paper. It keeps the ecosystem focused on decomposition rather than decay.
What size should my compost bin be?
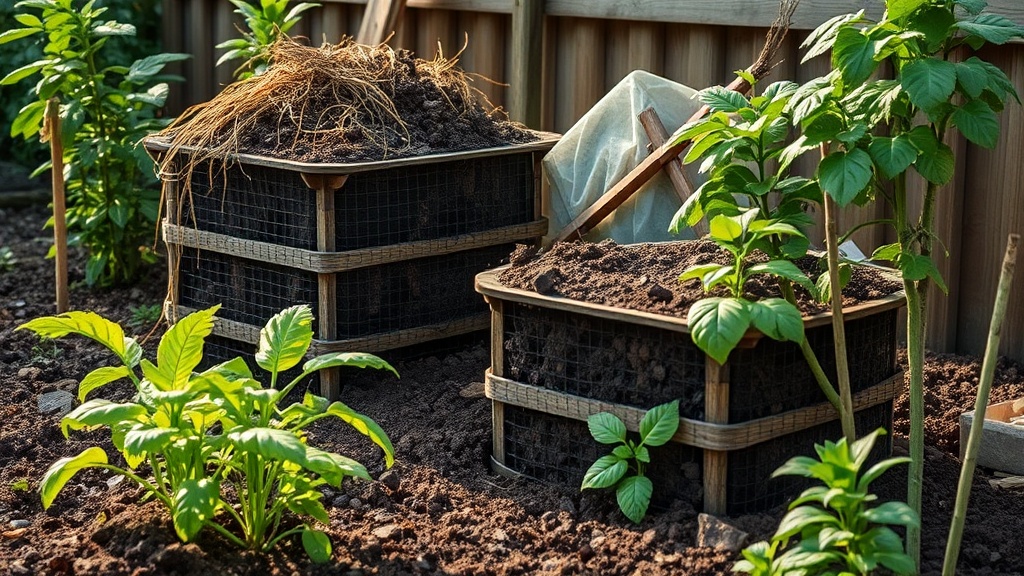
You don't need a fancy, expensive bin from a big-box store to get started. You can use a simple wooden pallet structure, a plastic tub with holes drilled in it, or even just a designated heap in a corner of the yard. However, size does matter. A pile that is too small won't hold enough heat to break down quickly, while a pile that is too large can become unmanageable.
A pile that is at least 3 feet wide by 3 feet deep (about a cubic yard) is usually the "sweet spot." This volume is enough to generate the internal heat necessary to kill weed seeds and pathogens, while still being small enough for a single person to turn with a pitchfork. If you are working with a smaller space, a tumbling composter can be a great option—they are easier to turn and look a bit tidier in a small suburban yard.
| Material Type | Examples | Function |
|---|---|---|
| Nitrogen (Greens) | Fruit scraps, Coffee, Grass | Provides protein for microbes |
| Carbon (Browns) | Leaves, Cardboard, Straw | Provides energy/structure |
| Aeration | Turning the pile | Adds oxygen for aerobic decay |
If you want to see how various materials break down over time, the University of Maryland Extension provides excellent visual guides and timelines for home gardeners.
How often should I turn my compost?
This is where the "work" happens. If you want fast results—meaning you want that compost ready for the garden in a few months rather than a year—you'll need to be diligent. I recommend turning the pile every 7 to 14 days. During the peak of summer, when the pile is working hard, you might even do it once a week. In the winter, you can let it rest; the microbes will still be working, just much more slowly.
As you turn the pile, watch the texture. It should look like dark, crumbly soil. If it looks like a pile of whole vegetable peels, it needs more time or more nitrogen. If it looks like a pile of dry twigs, it needs more moisture and more greens. The goal is a texture that feels like a wrung-out sponge—damp, but not dripping wet. This is the foundation of a healthy garden. When you eventually spread this finished compost around your vegetable beds or flower borders, you're giving your plants a gift that is far better than any bag of store-bought fertilizer. You're giving them life.